Balsamic & Fig Glazed Ham

(click for bigger view)

Surprise everyone this Christmas with a Balsamic & Fig Glazed Ham recipe from the chef Stefano Faita. The glaze is so good, you may just want to make a double batch so you have enough for leftovers too. Recipe serves 18 to 20 people.

INGREDIENTS
Balsamic and Fig Glaze
1 cup chopped fresh figs, stems removed
1/2 cup balsamic vinegar
1 tbsp. chopped rosemary
1 cup white wine
1 cup water
1/3 to 1/2 cup honey

Baked Ham
20 pound fully cooked, smoked whole ham, bone-in
Water, as needed for roasting pan

PREPARATION
Balsamic and Fig Glaze

1. Add figs, balsamic vinegar, rosemary, white wine, water and 1/3 cup honey to saucepan. Bring to a boil and then reduce to a simmer. Cook, stirring occasionally until mixture thickens, about 20 to 30 minutes. Taste and adjust for sweetness, adding more honey, if needed. Divide mixture in half, using half for brushing on to ham. Reserve remaining half for serving with ham.

Baked Ham
1. Preheat oven to 325 degrees F. Fit rack in roasting pan.

2. If needed, remove skin off the ham and trim any excess fat. With a sharp knife, diagonally score ham in a diamond pattern.

3. Place ham on a rack fitted in a roasting pan. Add enough liquid to come about 1/2-inch up the sides of the pan. Cover and bake until internal temperature reaches 100 to 110 degrees F., about 2 hours, adding more water if pan starts getting dry.

4. Increase heat to 400 degrees F. Uncover. Brush lightly with glaze. Continue baking uncovered, glazing every 15 to 20 minutes, until internal temperature reaches 130 to 140 degrees F., about 45 minutes to 1 hour.

5. Tent with foil and let rest for 20 to 30 minutes before serving. Serve with remaining Fig and Balsamic Glaze.

Chef Tips: If you can’t find fresh figs, substitute with 1/2 cup dried figs that have been stemmed and then purée the glaze before using.


[recipe as seen in: cbc.ca]

Stefano's Quick Beef Stew


Want to try something different, delicious and hearty? Try this warm and delicious recipe perfect for family dinner. Using beef tenderloin, carrots, onions and fresh rosemary this recipe will the favourite of the family. Total time 40 minutes. 

INGREDIENTS
1 pound beef tenderloin or strip loin steaks, cut into cubes
Salt and freshly ground pepper, to taste
Olive oil, as needed
2 tbsp. butter
1 small onion, diced
3 tbsp. chopped pancetta
2 ribs celery, chopped
1 garlic clove, finely chopped
2 sprigs rosemary or 1 tbsp. chopped rosemary
Pinch hot pepper flakes, optional
1 tbsp. tomato paste
2 tbsp. to 3 tbsp. flour
1/2 cup red wine
2 1/2 cups beef stock
2 carrots, sliced
10 to 12 mini potatoes, skin on, scrubbed and cut in half or quarters
1 bay leaf
1 cup frozen peas, thawed
2 tbsp. chopped parsley

DIRECTIONS
1. Season cubes of beef with salt and pepper.

2. Heat large skillet over medium high heat. Add 2 tbsp. olive oil and 2 tbsp. butter. When oil is hot, add beef in batches, browning on all sides, about 5 minutes. (Don’t overcook the beef.) Transfer to plate.

3. Add 1 tbsp. olive oil if pan looks dry. Add onions, pancetta, celery, garlic, rosemary and hot pepper flakes. Cook until veggies are soft and lightly golden, about 3 to 5 minutes.

4. Add tomato paste and cook for 1 minute. Add flour. Stir and cook for 1 to 2 minutes. Whisk in red wine let reduce for 2 to 3 minutes. Add stock, carrots, potatoes and bay leaf.

5. Bring to a boil. Cover, reduce heat to medium low. Cook until carrots and potatoes are tender, about 12 to 15 minutes. Add beef and any juice back to pan, peas until both are heated through. Taste and adjust for seasoning. Finish with chopped parsley. Remove bay leaf before serving.


[recipe as seen in: cbc.ca]

Turkey breast with Fresh Mozzarella stuffing


This delicious turkey breast fill with fresh mozzarella is perfect for Thanksgiving Day or Christmas, is easy and nutritious. Ideal for lunch, dinner or for your lunchbox. Surprise the family with your chef skills for a unforgettable yummy evening!

INGREDIENTS
1/3 cup (75 mL) pine nuts
1/2 cup (125 mL) quinoa
1 apple, diced
1 onion, chopped
1 pinch of ground cinnamon
6 oz (180 g) Fresh Mozzarella, finely diced
Salt and freshly ground pepper
2 lb (1 Kg) turkey breast, skinless and boneless
1 1/2 cups (375 mL) low-sodium chicken broth
3 cups (750 mL) kale, coarsely chopped
1 tbsp (15 mL) flour
1/2 cup (125 mL) 18% cooking cream

DIRECTIONS
1. Preheat oven to 375oF (190oC).

2. In an oven-safe dish, toast pine nuts for 5–7 minutes or until golden.

3. In a saucepan, cook quinoa in salted boiling water for 10 minutes. Drain and cool under cold running water. Drain again. In a bowl, mix quinoa, apple, onion, cinnamon, pine nuts and Fresh Mozzarella. Season with salt and pepper.

4. Cut turkey breast in half lengthwise, without cutting all the way through, and open up like a book. Place turkey breast in an oven-safe dish. Place stuffing on bottom half and close top half so stuffing is secured inside. Hold in place with toothpicks or string.

5. Pour in broth, cover and cook for 30 minutes.
6. Place kale around turkey breast, cover and continue cooking for 30 minutes.
7. Remove cover and cook for 15 more minutes until turkey is golden.

8. Pour broth into a saucepan and bring to a boil. Mix flour with cream, then add mixture to saucepan. Stirring with a whisk, allow to thicken until creamy.

9. Slice and serve turkey and kale topped with sauce.


[recipe & photo belongs to: dairygoodness.ca]

Double-Chocolate Caramel Apples


Ready to try something new for this Halloween? Try this delicious (and fun!) recipe Double-Chocolate Caramel Apples. This recipe is perfect for kids, dessert and celebrations! Everyone will love this apples.

INGREDIENTS
5 Granny Smith or Fuji apples
14 ounces unwrapped soft caramels
2 tablespoons water
5 ounces bittersweet chocolate
5 ounces milk chocolate
1 cup chopped toasted almonds (optional)

DIRECTIONS
1. Rinse and dry 5 apples (we prefer Granny Smith and Fuji varieties, 6 to 8 oz. each). Insert a craft or popsicle stick halfway into the stem end of each apple. Line a baking sheet with plain parchment paper or wax paper that has been generously coated with butter.

2. In a bowl set over a pan of simmering water, combine 14 ounces (about 50 pieces) unwrapped soft caramels (such as Kraft) and 2 tablespoons water. Stir frequently until melted and smooth.
3. Holding the stick, dip each apple one at a time into the caramel about three-quarters of the way. Swirl to coat evenly.

4. Hold stem side up and use a knife to scrape excess caramel off the bottom of apple back into bowl. Place apples on the parchment paper or buttered waxed paper and refrigerate until caramel is firm, about 5 minutes.

5. Return pan of water to a boil; remove from heat. Place 5 ounces bittersweet chocolate in another bowl and set over pan. Stir frequently until chocolate is melted and smooth.

6. Dip one side of each apple in the bittersweet chocolate, turning to coat evenly. Hold stem side up and use a knife to scrape excess chocolate off bottom of apple and back into bowl. Place each coated apple on the parchment paper or buttered waxed paper and refrigerate until chocolate is slightly set, about 10 minutes.

7. Return pan of water to a boil; remove from heat. Place 5 ounces milk chocolate in another bowl and set over pan. Stir frequently until chocolate is melted and smooth.

8. Dip other side of each apple in milk chocolate, turning to coat evenly. Hold stem side up and use a knife to scrape excess chocolate off bottom of apple and back into bowl. Place each coated apple on the parchment paper or buttered waxed paper and refrigerate until chocolate is slightly set, about 10 minutes.

9. If desired, place 1 cup chopped toasted almonds (optional; we love the way these look without the nuts) on a plate. Roll bottom third of each apple in almonds to coat. Refrigerate until chocolate is firm, about 15 minutes.


[recipe & photo courtesy of: myrecipes.com]

Pumpkin Swirl Cheesecake Squares


October and November is the month of the pumpkin, and what better way to show your baking skills, than with delicious (and good looking!) Pumpkin Swirl Cheesecake Squares. Perfect for a Halloween party, Thanksgiving dessert or just a nice Sunday evening.

INGREDIENTS
Crust:
1 cup all-purpose flour
¼ cup packed light brown sugar
⅓ cup cool unsalted butter, cut into pieces

Pumpkin Cheesecake:
½ package brick cream cheese, at room temperature
¾ cup sugar
1 cup pure pumpkin purée
2 tablespoons all-purpose flour
½ teaspoon baking powder
½ teaspoon ground cinnamon
1 whole egg, at room temperature
1 egg yolk

Cheesecake Swirl:
¼ package brick cream cheese, at room temperature
1 ½ tablespoons sugar
1 egg yolk
½ teaspoon vanilla extract

DIRECTIONS
1. Preheat the oven to 350 F. Grease an 8-inch square pan and line it with parchment so that the paper comes up the sides of the pan.

2. For the crust, using a food processor, pulse the flour and brown sugar together, then cut in the butter until evenly blended (the mixture will be dry and crumbly). Alternatively, this base can be made by hand, blending the butter into the flour and sugar using a pastry cutter. Press this into the prepared pan and bake it for about 18 minutes, until it turns just a little brown at the edges. Cool while making the filling.

3. Beat the cream cheese to soften and then beat in the sugar. Add the pumpkin and stir until smooth. Switch to a whisk and add in the flour, baking powder and cinnamon. Whisk in the egg and egg yolk and set aside.

4. For the cheesecake swirl, beat the cream cheese until smooth and then beat in the sugar. Stir in the egg yolk and vanilla until smooth.

5. Pour the pumpkin cheesecake onto the cooled crust. Either spoon or pipe the cheesecake swirl on top and use a bamboo skewer to create pretty swirls. Bake for about 30 minutes until, like a cheesecake, the filling is set at the edges but still has a little jiggle at the centre. Cool the squares to room temperature, then chill for at least 2 hours before slicing.

6. The squares will keep, refrigerated, for up to 3 days.


[recipe & photo belongs to: foodnetwork.ca]

Best-ever mashed potatoes


Get ready for a delicious recipe of mashed potatoes, this side dish goes well with any lunch or dinner. Perfect for Thanksgiving Day, Holidays and any other celebration. What you're waiting for? try the best-ever mashed potatoes! 

Preparation time: 25 minutes
Total time: 1 hour 10 minutes

INGREDIENTS 
5 lb. russet or Yukon gold potatoes
1 1/2 cup half and half cream
1 1/2 tsp Dijon mustard
1/2 tsp salt
1/2 tsp black pepper
1/2 cup unsalted butter
1/2 cup chopped chives (optional)

DIRECTIONS
1. Peel and cut potatoes into large, even-sized pieces. Place in a large pot. Cover with water, and bring to a boil over high heat. Reduce heat. Simmer, covered, until very tender, 25 to 30 min. Drain well.

2. Pour cream into a large measuring cup or small saucepan. Whisk in Dijon, salt and pepper. Add butter. Heat in the microwave or on stovetop until hot, but not boiling.

Place drained potatoes back in pan over warm (but off) burner to evaporate excess moisture. Mash until very smooth. Stir warm cream mixture, then pour into potatoes. Fold or stir to evenly mix. Taste and season with more salt, if you like. Serve garnished with chives, if using.

NOTES FROM THE CHEF
Starchy potatoes such as russet, and creamy varieties such as Yukon Gold, yield the best texture.


 Originally published in the Walmart Live Better Fall 2013 issue / Photo: John Cullen

Roasted cheese and herb stuffed mushrooms


This delicious Roasted cheese and herb stuffed mushrooms will impress your guests, family and friends. The cheese and mushrooms are the perfect combination for your celebrations, what better appetizer that one made from the chef! (you)

Preparation time: 25 minutes
Total time: 45 minutes
Makes: 24 servings

INGREDIENTS
2 pkgs large button mushrooms (each 397 g)
125-g pkg goat or brie cheese
1/3 cup bread crumbs
2 tbsp chopped chives, plus more for garnish
1 tbsp finely chopped parsley, plus more for garnish
4 strips bacon

DIRECTIONS
1. Preheat oven to 425F. Line a baking sheet with foil or parchment paper. Remove stems from mushrooms and place on prepared baking sheet. Crumble goat cheese into a small bowl. If using brie, dice and place in bowl. Add bread crumbs and herbs. Stir to evenly mix (you may need to rub the mixture with your fingertips). Divide cheese mixture stuffing into mushrooms.

2. Cook bacon in a medium skillet over medium heat, stirring often until bacon is brown, crisp and most of the fat has been rendered off, 8 to 10 min. Crumble cooked bacon overtop mushrooms.

3. Bake in centre of preheated oven until mushrooms are tender, about 18 to 20 min. Garnish with chopped chives and parsley, if you like. Serve warm.


Originally published in the Originally published in the Walmart Live Better Fall 2013 issue./ Photo: John Cullen

Mini pumpkin scones with cinnamon cream cheese glaze


Autumn / Fall is here! and is the perfect for bake with pumpkin, give it a try! start with this delicious Mini pumpkin scones with cinnamon cream cheese glaze. Perfect for Thanksgiving, Autumn, Christmas or any season! 

Preparation time: 20 minutes
Total time: 40 minutes
Makes: 20 scones

INGREDIENTS
For scones:
2 1/2 cups all-purpose flour
1 tbsp baking powder
2 tsp baking soda
1/2 tsp salt
1 tsp ground cinnamon
1/4 tsp ground nutmeg
3 tbsp brown sugar, packed
1/4 cup unsalted butter, cold and cut into 1/2-in. cubes
1/4 cup non-hydrogenated margarine
1 1/2 cups canned pumpkin purée

For glaze:
1/2 pkg cream cheese at room temperature (about 125 g)
1/2 cup icing sugar
1 tsp ground cinnamon
2 tbsp hot water

DIRECTIONS
1. Preheat oven to 400F. Line a baking sheet with parchment paper and set aside. Stir flour with baking powder, baking soda, salt, cinnamon, nutmeg and brown sugar in a large bowl. Lightly mix in the butter and margarine using a pastry cutter or fork. Stop mixing when it resembles a coarse meal; do not overwork.

2. Add pumpkin purée and stir until fully combined. Line your counter with a piece of parchment paper. Turn out dough onto parchment and press out until it is an even 1-in. deep.

3. Cut into 4-in. by 4-in. squares, then cut again diagonally to form rectangles. Bake for 10 to 12 min, or until golden. Remove to a rack to cool slightly.

4. Beat cream cheese with an electric mixer in a large bowl until fluffy. Mix icing sugar and cinnamon together in a small bowl. Add the cinnamon-sugar mixture to cream cheese and beat until fluffy. Add water and continue to beat until smooth and creamy. Cover with plastic wrap and set aside until ready to use. Drizzle glaze over warm scones and serve immediately, or refrigerate in an airtight container for up to 1 week.


Originally published in the Walmart Live Better Back to School 2013 issue / Photo: John Cullen

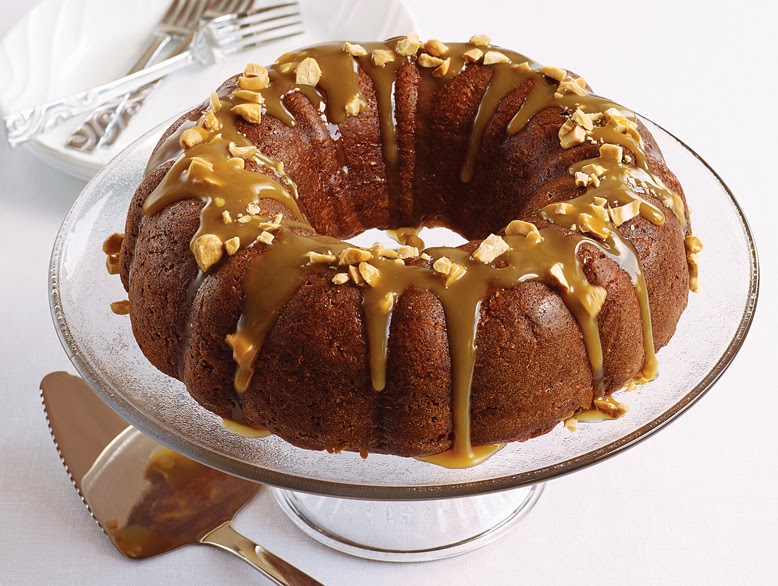
Apple coffee cake with maple-caramel


If your new to baking, this recipe Apple coffee cake with maple-caramel is delicious and perfect for celebrations; Birthdays, Thanksgiving, Christmas. It taste delicious and it looks amazing.

Preparation time: 20 minutes
Total time:1 hour 20 minutes
Makes:8 to 10 servings

INGREDIENTS
butter for baking pan
2 apples (we used Pink Lady and Gala)
2 cups all-purpose flour
1 tsp baking soda
1/2 tsp salt
1 tsp cinnamon
pinch ground cloves
1/2 cup unsalted butter, at room temperature
3/4 cup brown sugar
3/4 cup granulated sugar
3 eggs
1/2 tsp vanilla
1 cup sour cream

TOPPING
1/3 cup maple syrup
1/3 cup brown sugar
pinch salt
1/3 cup whipping cream
1/2 cup chopped, roasted and salted cashews

DIRECTIONS
1. Preheat oven to 350F. Grease and flour the inside of a Bundt pan or angel food cake pan

2. Peel, core and grate apples. Set aside.

3. Stir flour with baking soda, salt and spices. Set aside.

4. Beat butter with sugars using an electric mixer until creamy, about 2 min. Add eggs, one at a time, beating between each addition. Beat in vanilla. Gradually beat in one-third of flour mixture just until blended, then half of sour cream. Repeat additions, ending with flour mixture. Stir in grated apple.

5. Spoon batter into pan, smoothing the top. Bake in centre of oven until golden and a tester inserted into centre of cake comes out clean, 50 to 55 min. Cool in pan on a rack for 10 min, then invert cake onto a cooling rack to cool completely.

6. Combine maple syrup, sugar and salt in a small pot over medium heat. Stir until sugar is dissolved. Bring to a boil, then reduce heat to low and simmer for 2 min. Add whipping cream and bring back to a boil. 

7. Reduce heat and simmer, stirring occasionally, until caramel is thick and deep golden, 10 to 12 min. Remove from heat and let cool completely.

8. Drizzle cooled cake with topping and sprinkle with cashews before serving.


Originally published in the Walmart Live Better Fall 2013 issue / Photo: Vince Noguchi 

Black Eyed Pea and Peach Salad


This delicious Black Eyed Pea and Peach Salad is the perfect example of how to mix fruits with your salad, it gives a sweet touch to the recipe. Is perfect as an appetizer, side dish, lunch or celebrations. You can replace the peaches for pears, apples or nectarines. Serves 6 dishes.

INGREDIENTS
6 large handfuls baby spinach (about 8 cups)
1 (14 ounce) can black-eyed peas
2 peaches, sliced
5 slices bacon, diced and cooked until crispy
1/2 red onion, sliced
Handful chopped toasted pecans, for garnishing

Dressing
1/3 cup olive oil
3 tbsp. white wine vinegar
1 tsp. Dijon mustard
1 clove garlic, minced
Pinch sugar
Salt and freshly ground black pepper, to taste

PREPARATION
1. Add spinach, black-eyed peas, peaches, bacon, red onion and pecans to a large large bowl.

2. For the dressing: combine olive oil, white wine vinegar, Dijon mustard, garlic, sugar and salt and pepper.

3. Toss salad with dressing. Taste and adjust for seasoning. Garnish with more pecans, if desired.


[recipe courtesy of: cba.ca and Stefano Faita]

Roasted Garlic Mashed Potatoes


This Roasted Garlic Mashed Potatoes goes well with anything! Perfect with chicken, meat or fish, this creamy recipe is perfect for Thanksgiving and Fall, it makes the perfect warm combination for a delicious meal. Easy to make, side-dish and yummy-licious!

Preparation time: 10 minutes
Cook time: 1 hour
Total time: 1 hour, 10 minutes
Recipe makes 8 servings

INGREDIENTS
1 medium head garlic
1 tablespoon olive oil
2 pounds russet potatoes, peeled and quartered
4 tablespoons butter, softened
1/2 cup milk
salt and pepper to taste

DIRECTIONS
1. Preheat oven to 350 degrees F (175 degrees C).

2. Drizzle garlic with olive oil, then wrap in aluminum foil. Bake in preheated oven for 1 hour.

3. Bring a large pot of salted water to a boil. Add potatoes, and cook until tender, about 15 minutes. Drain, cool and chop. Stir in butter, milk, salt and pepper.

4. Remove the garlic from the oven, and cut in half. Squeeze the softened cloves into the potatoes. Blend potatoes with an electric mixer until desired consistency is achieved.


[recipe & photo credit: allrecipes.com]

Boulangére Potatoes


This French style scalloped potatoes are perfect for a side dish, easy to make, quick and they are delicious. Try this Boulangére Potatoes with lamb, beef or chicken and a healthy salad. Enjoy!

Preparation time: 10 minutes
Cook time: 1 hour, 30-60 minutes
Yield: 8 servings.

Ingredients
1/4 cup butter
About 2 cups chicken stock or vegetable stock
8 medium Yukon Gold potatoes
Salt and freshly ground pepper, to taste
1 large onion, sliced
2 tbsp. olive oil
2 tbsp. chopped parsley, for garnishing

Directions
1. Preheat oven to 375 degree F.
2. Butter a large baking dish with 1 tbsp. butter.
3. Bring the stock to a boil as you slice the potatoes.
4. Using a mandolin or sharp knife, thinly slice the potatoes. Add potatoes to a large bowl. Season with salt and pepper and toss.

5. Add potatoes and a few pieces of butter to the prepared baking dish. Add enough stock to cover potatoes by about 2/3’s. Press down gently with your hands. Sprinkle sliced onions evenly on top. Drizzle with olive oil and dot with a few more pieces of butter.

6. Cover with foil and bake for 1 hour. Remove foil and continue to bake potatoes until golden brown and fork tender, about 30 to 60 minutes.


[recipe &photo credit belongs to: www.cbc.ca]

American Macaroni Salad


There's nothing better than a delicious American Macaroni Salad, a light and healthy lunch or side dish. This crunchy recipe is full of fresh vegetables and nutrients, can be serve for Summer or any special event. 

Total Time: 30 minute
Preparation Time: 20 minutes
Cook time: 10 minutes

Ingredients
2 cups dry elbow macaroni, cooked, rinsed, and drained
1/3 cup diced celery
1/4 cup minced red onion, soaked in cold water for 5 minutes, drained
1 tablespoon minced flat-leaf parsley
1/2 cup diced vine-ripened tomato (optional)
1/2 cup prepared mayonnaise
3/4 teaspoon dry mustard
1 1/2 teaspoons sugar
1 1/2 tablespoons cider vinegar
3 tablespoons sour cream
1/2 teaspoon kosher salt, plus more to taste
Freshly ground black pepper

Directions
In a large bowl combine the macaroni, celery, onion, parsley and tomato, if using. In a small bowl, whisk together the mayonnaise, mustard, sugar, vinegar, sour cream and salt. Pour the dressing over the salad and stir to combine. Season with salt and pepper to taste. Serve. Store covered in the refrigerator, for up to 3 days.

Nutrition Table
Per Serving: Calories: 286; Total Fat: 16.5 grams; Saturated Fat: 3 grams; Protein: 5 grams; Total carbohydrates: 28 grams; Sugar: 3 grams; Fiber: 1 grams; Cholesterol: 10 milligrams; Sodium: 292 milligrams


[recipe credit belongs: FoodNetwork]

Mamma Agata's Recipe for Lemon Cake (Dolce al limone di Mamma Agata)

photo / Delectable Destinations

If you love bake, you must try this recipe! Mamma Agata's Lemon Cake! this cake is perfect for summer, spending time with the kids, enjoying a family-friendly day, well for any occasion. This recipe is from her "Simple and Genuine family cookbook". This cake is perfect to drink with tea, lemonade or coffee.

Ingredients
300 gr or 1 1/4 cups sugar

250 gr or 2 sticks butter (1/2 lb), PLUS an additional 1.5 Tablespoons butter, to grease the pan

4 eggs

Grated zest of 2 large lemons (4 lemons, if small)

A pinch Sea salt

300 gr or 2 cups “00” Flour
16 gr or 2 tablespoons of Pan degli Angeli Italian baking powder

125 ml or 1/2 cup whole milk

50 gr or 1/4 cup hazelnuts (finely chopped and toasted)

Lemonade Mixture
300 ml or 1 1/4 cups water
Juice of 3 lemons

8 Tablespoons sugar

Directions
1. Pre-heat the oven to 175 degrees Celsius or 350 degrees Fahrenheit. Whip the butter in a mixing bowl on high speed for at least two minutes. Add the sugar and continue to whip until a soft cream forms. Mix the baking powder into the flour and set aside.Add the following ingredients to the mixing bowl, one at a time, and blend after each:
 Eggs, one at a time, 
salt, grated lemon zest
.

2. Alternate adding and blending the following ingredients into the mixing bowl: 
Flour and baking powder mixture and milk. In other words, add one quarter of the flour and blend; then, add one quarter of the milk and blend. Repeat this process until all of the flour and milk are blended into the batter.

3. Mix the ingredients on medium speed for about five minutes until the texture of the batter has a light and airy consistency (similar to a mousse). NOTE: Do not beat the batter for longer than five minutes after adding the baking powder.

4. Coat the surface of the fluted pan with butter before dusting it with flour. Shake off any excess flour before adding your cake batter to the pan.  NOTE: This step creates a non-stick surface so that the cake will easily release from the pan and retain its shape.

5. Pour the batter into your greased and floured pan. Bake the cake in the pre-heated oven for forty minutes. While the cake is baking in the oven, prepare the lemonade mixture as follows.

6. Squeeze the lemons into a pitcher (or other container from which you can easily pour the lemonade mixture later). Add the sugar to the lemon juice.
 Mix until the sugar is fully dissolved in the lemon juice. Add the water. Once the lemon cake is finished baking, let it sit for two hours outside the oven to bring it to room temperature.

7. Before we start this process, we want to ensure that the cake does NOT stick to the pan. In getting it to room temperature, the butter has solidified and that means there is a risk that the cake will stick to the pan. Here is the process just to ensure it does NOT stick to the pan before we proceed.

8. Place a plate on top of the pan. Tip the pan over and carefully shake the cake out of the pan. Immediately, place the cake pan back onto the cake. Carefully turn the pan back over. Remove the plate to expose the cake. This will seem like we have done nothing, but what we have done is to ensure that the cake will not stick later when we are ready to plate it. 

NOTE: If the cake does seem like it wants to stick, you will need to place the cake back in the oven for a few minutes, just to warm the butter, and it will release from the pan easily.

9. Now it is time to add the lemonade mixture to the cake – that is what makes it so moist.

10. Over thirty minutes: Slowly pour a little bit of the lemonade mixture all over the cake in the pan every ten minutes (i.e. three times in total). This will allow the cake to absorb the lemonade mixture very slowly. You should NOT have used all of the lemonade mixture at this point.

11. After thirty minutes, tip the lemon cake onto a serving plate and add the remaining lemonade to the top of the cake, distributing it evenly all over the cake. 

NOTE: If you feel that the cake is still too dry, you may make a little more of the lemonade. Garnish the cake with finely chopped hazelnuts.


[recipe as seen on Martha's Stuart]

 
  • Oven Lovers © 2012 | Designed by Rumah Dijual, in collaboration with Web Hosting , Blogger Templates and WP Themes